Tahnnakai-Tempel (Mission)
| Tahnnakai-Tempel (Mission) | |
|---|---|
| Typ | Mission |
| Kampagne | Factions |
| Region | Stadt Kaineng |
| Nachbarn | |
| Shenzun-Tunnel, Tahnnakai-Tempel (Erforschbar) | |
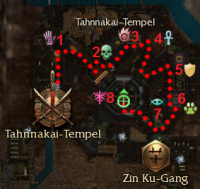
| Karte | |
Inhaltsverzeichnis
Ziele
Haltet den Geistfessler davon ab, Vizu zu verzehren
- Ihr habt X Seelen von 8 befreit.
- Meister Togo muss überleben.
- Bruder Mhenlo muss überleben.
Belohnung
Normaler Modus
- Standard = > 25 Minuten
- Experte = < 25 Minuten
- Meister = < 20 Minuten
Schwerer Modus
- Standard = > 35 Minuten
- Experte = 30-35 Minuten
- Meister = < 30 Minuten
Walkthrough
Players start with 10 minutes to free Vizu from the Spirit Binder, and gain 4 additional minutes for each soul freed.
This mission is comprised of a chain of rooms, each containing a Bound Hero boss, a number of Afflicted, and usually a few Temple Guardians. To proceed to the next room, the bound hero must be defeated, releasing the hero who will unlock the gate to the next room. Usually, the boss is not grouped with the surrounding afflicted, allowing the afflicted to be dispatched without encountering the boss. Likewise, Temple Guardians often are able to be pulled without drawing the attention of nearby afflicted. Thus, proper pulling techniques will increase the chance of survival. Beware of the Temple Guardians AoE attacks, as they can be devastating when stacked. Finally, with a boss in every room, Resurrection Signets are recharged often.
Bound Kitah (Room 1)
Pairs of Temple Guardians guard each door and can be pulled without aggro to nearby afflicted. A mix of afflicted monks, ritualists, and rangers reside in the center along with the mesmer hero, Kitah. It helps to kill casters first to keep them from resurrecting and healing their allies.
Tipp für Meister: Die Wächter links kann man stehenlassen, wenn man am rechten Pfosten durch das Tor geht.
Bound Naku (Room 2)
This room has three pathways. The center contains the necromancer hero, Naku, along with Temple Guardians while the other two contain afflicted. Each group can be pulled separately, but it can be tricky to keep from coming into aggro range of others. The afflicted on the right fork may be ignored altogether if not aggroed.
Tipp für Meister: Gefolgsleute am Kopfende der Treppe stehen lassen und ganz vorsichtig nur die beiden Wächter und den Boss anlocken und zur Gruppe bringen.
Bound Teinai (Room 3)
Walkways surround a pitted courtyard in this room. In the pit, a group of mainly necromancer and warrior afflicted are led by the elementalist hero, Teinai. All of the afflicted save a single monk are grouped together, so it is very difficult to separate them. It is best to pull back, keeping Teinai far out of aggro range while keeping from being pincered between the oncoming afflicted. When facing Teinai, be very careful, as Sliver Armor may kill anyone nearby in seconds.
Tipp: Einfach am Eingang des Raumes warten, die Gegner kommen von ganz alleine.
Bound Karei (Room 4)
Temple Guardians stand between the gates and a raised platform populated by afflicted and the monk hero, Karei. The four Temple Guardians on the floor may be pulled in pairs apart from the rest of the enemies and thus can be easily defeated. When taking on the platform group, it is advisable to eliminate the remaining two Temple Guardians first before finishing off the afflicted. In spite of being a monk, Karei falls quite easily under pressure.
Tipp: Rechts an der Wand lang und erst die drei Wächter an der rechten Ecke alleine anlocken und vernichten. Danach die Gruppe vor das Tor positionieren und vorsichtig die Waldläufer und später den Boss anlocken und umlegen.
Bound Jaizhanju (Room 5)
Afflicted warriors, monks, and elementalists guard the warrior hero, Jaizhanju, in this room. If pulled, the afflicted warriors will often be out of range of the monks towards the back. The main danger is the group of three afflicted elementalists that can cause heavy amounts of damage if their fire is concentrated. There are two exits to this room, both guarded by a small group of afflicted. It is advised to kill both groups before moving on; otherwise, the untouched group will run into the next room, making the following fight much more difficult.
Tipp: Die rechte Gruppe stehen lassen. Links vorbeigehen und erst auf die gefährlichen Elementarmagier konzentrieren. Nach dem Mönch kann dann der Boss umgelegt werden. Danach das erst das rechte Tor befreien dann sofort das linke Tor und dort weiter in den nächsten Raum.
Bound Zojun (Room 6)
In the sixth room, four Temple Guardians stand between the gates and a raised platform on which afflicted and the ranger hero, Zojun, resides. It is advised to walk in until just outside of the aggro range of the Temple Guardians. The afflicted will now start patrolling. Back off a little bit and kill the patrols when they get to you before you start engaging the Temple Guardians.
Tipp: Links hineingehen und nicht die Wächter locken. Die Befallenen kommen von ganz alleine. Erst wenn die Befallenen tot sind die Wächter anlocken und vernichten und zum Schluß den Boss.
Bound Kaolai (Room 7)
Oriented similarly to the fifth room, the danger of this room lies in the patrol of Afflicted Elementalists marching around the ritualist hero, Kaolai. They will often spike the same target; a high armored warrior or ranger (as it is elemental damage) should attempt to draw their initial volley of spells. A pair of Temple Guardians and another elementalist guard the exit gate and are easily aggroed during the battle. The elementalist may be pulled quite easily, but the Temple Guardians are sometimes more difficult. Also keep in mind that Kaolai casts the Restoration spirit, acting as an AoE resurrect if the afflicted are not pulled away from it.
Tipp: Die Gegner vorsichtig versuchen in kleinen Gruppen anzulocken und zur Spielergruppe bringen.
Bound Vizu (Room 8)
The final room is a circular rim connected to a central island by four bridges. Each path is guarded by a pair of Temple Guardians, and afflicted rangers patrol both clockwise and counter-clockwise around the rim. In the center, a sizable group of afflicted led by the assassin hero, Vizu, await. To finish the mission, all afflicted on the central island and Vizu must be defeated. The Temple Guardians and surrounding afflicted may be left alone. It is best to clear a bridge to the center then pull the afflicted to the bridge, thus grouping them for AoE attacks and allowing warriors to body block. Should assassins wish to capture Vizu's elite, she needs to be defeated before the last afflicted is killed.
Tipp: Zwei patroullierende Waldläufer umlegen und dann hinter einer Brücke aufstellen. Die Gegner aus der Mitte vorsichtig über die Brücke locken. Den Rest dann in der Mitte erlegen.
Tips for Masters
- As with any mission with a large number of Afflicted, corpses abound, so bringing along a Minion Master can help immensely. Just be aware that the minions may inadvertantly aggro unwanted groups.
- A ranger's Edge of Extinction spirit can help to quickly mow down the Afflicted. A couple of deaths is usually enough to get a chain reaction going. Be aware, however, that use of this spirit can prove counter-productive if there is a minion master in the same group.
- Consider bringing a warrior with the "Charge!" elite skill to help the party move quickly between rooms.
- It is advisable to have elementalists with AoE spells, as well as tanks and minions to body block the afflicted so that the elementalists can cast their spells.
- It is advisable that you have a timer of 19:30 at the time that you leave the room with the ritualist. However, this can vary, based on your speed in the completion of the final room.
Creatures
NPCs
 20 Master Togo
 20 Brother Mhenlo
- 20 Kitah
- 20 Naku
- 20 Teinai
- 20 Karei
- 20 Jaizhanju
- 20 Zojun
- 20 Kaolai
- 20 Vizu
Monsters
Bosses (Elite Skill Captures)
 24 Bound Kitah → (Arcane Languor)
 24 Bound Naku → (Wail of Doom)
 24 Bound Teinai → (Star Burst)
 24 Bound Karei → (Spell Breaker)
 24 Bound Jaizhanju → (Auspicious Parry)
 24 Bound Zojun → (Famine)
 24 Bound Kaolai → (Defiant Was Xinrae)
 24 Bound Vizu → (Shroud of Silence)
Dialogues
Vorlage:Section-stub Brother Mhenlo: This is a part of Cantha that I wish I had explored more of while I was here in my early years.
Master Togo: Come, let us find Vizu. There is no time to waste!
Master Togo: We do not have much time before Vizu is bound. Perhaps if we free the other spirits, they can lend their strength to Vizu.
Folge
- Nach Beendigung der Mission befinden sich die Spieler im Zin-Ku-Gang
- Um die Geschichte weiterzuführen muss man die Primäre Quest Treffen mit dem Kaiser annehmen
Notes
- Temple Guardians (usually on the perimeter of each area) don't drop corpses, so don't rely on them for Death Magic spells. And they are not fleshy creatures.

